Saturday, September 14, 2019

Sentry integration to an Android application - Sentry logging

Date : 14 / 09 / 2019

Hi,

In my recent project I had to integrate logging mechanism for the android project. Although I have used Google Analytics, Crashlytics and Appcenter Analytics it was not enough for this project. Because the administer should be provided with a one-stop dashboard for view both android app and backend server errors.

So we implemented sentry for both backend and android app. The documentation is not giving enough information so I'm writing this blog to easily integrate Sentry to your android project.

First implement following libraries in your app.gradle file, inside dependencies block.

//sentry loggingimplementation 'io.sentry:sentry-android:1.7.27'
implementation 'io.sentry:sentry-logback:1.7.27'

The sentry-android is of cause for integrating sentry to android, and the sentry-logback is for capture and send log report to the sentry. We can ignore this sentry-logback and use ,

try(exception: Exception){
  // some code which returns exception 
}catch { 
  Sentry.capture(exception) 
}

But this only capture exceptions. We need more than that. we need info, warning, errors and get that stacktrace. That's why we use sentry-logback. There are many substitute libraries like Timber, Log4j and many others. You can try them too. 

Next click src -> main. Right click on main folder, then New -> Directory. Name it as "resources". This name is important because by default Sentry is looking at this directory to get values. Create logback.xml and sentry.properties files inside this directory.
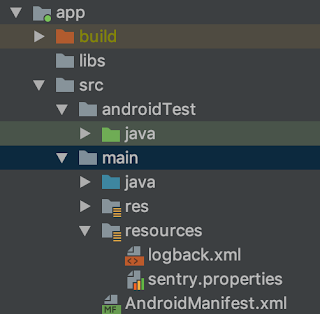


You need url to put inside sentry.properties file. I think you already created a Sentry project. You can have multiple projects inside a project. Let's say We have a project called SamProj. Inside it we have AndroidSamp and WebSamp. Goto settings in SamProj. select projects tab -> select AndroidSamp. Then select Client Keys (DSN). Copy that DSN.

paste your dsn code in your sentry.properties file as below. following code is just a sample.

dsn=https://asdadadddada333444sdfsdfsdfe@sentry.io/234234435
anr.enabled = true

Next in logback.xml paste the following code. You can use this as it is. 


<configuration>    <!-- Configure the Console appender -->    <appender name="Console" class="ch.qos.logback.core.ConsoleAppender">        <encoder>            <pattern>%d{HH:mm:ss.SSS} [%thread] %-5level %logger{36} - %msg%n</pattern>        </encoder>    </appender>
    <!-- Configure the Sentry appender, overriding the logging threshold to the WARN level -->    <appender name="Sentry" class="io.sentry.logback.SentryAppender">        <filter class="ch.qos.logback.classic.filter.ThresholdFilter">            <level>INFO</level>        </filter>    </appender>
    <!-- Enable the Console and Sentry appenders, Console is provided as an example of a non-Sentry logger that is set to a different logging threshold -->    <root level="INFO">        <appender-ref ref="Console" />        <appender-ref ref="Sentry" />    </root></configuration>


Ok. Now configuration part is done. Let's move to the codes.

There was a requirement to get logs separately by environment. Which means by Production environment(actual user devices) and development environment(test devices). So we created a gradle build config variable for that purpose.

In app.gradle,


buildTypes {
    release {
        it.buildConfigField 'String', "ENVIRONMENT", '"release"'    }
    debug {
        it.buildConfigField 'String', "ENVIRONMENT", '"development"'    }
}


Create an Application class, and paste the following code.

class MainApplication: Application() {
    override fun onCreate() {
        super.onCreate()
        Sentry.init(AndroidSentryClientFactory(this))
        Sentry.getStoredClient().environment = BuildConfig.ENVIRONMENT    }
}

Don't forget to register this application class in your manifest file.

<application
android:name=".MainApplication">

Next create a BaseActivity. All your other activities must extend from this class so we can change one file and that change will propagate to child classes. If not you can directly code in your activity classes but that's not a good practice since then every time you are duplicating codes.


open class BaseActivity: AppCompatActivity() {

    private val logger = LoggerFactory.getLogger(this::class.java.simpleName)

    fun logApplicationError(error: String){
        logger.error(error)
    }

    fun logApplicationException(error: Exception){
        logger.error("Exception caught", error)
    }

    fun logApplicationInfo(info: String){
        logger.info(info)
    }

}

Now all you have to do is call these methods from your child activities and if any error or exception occurs, It will send that log to Sentry.


class QRCodeActivity : BaseActivity() { // make sure to extend from BaseActivity

private fun textToQRImage(text: String): Bitmap? {
    val bitMatrix: BitMatrix
    try {
        bitMatrix = MultiFormatWriter().encode(
            text,            BarcodeFormat.QR_CODE,            QRCodeSize, QRCodeSize, null        )

    } catch (exception: IllegalArgumentException) {
        logApplicationException(exception)
        return null    }
}

}


That's it. Now in your Sentry dashboard, you can filter error logs by environment with other data when errors happens and take necessary actions. There is a section in Sentry documentation that we should add another library with related to ProGuard.
https://docs.sentry.io/clients/java/integrations/#proguard

I still didn't use this and if anyone know what is the use of this please tell us in the comment section. I will update this blog when I got my hands dirty with sentry proguard integration.

That's it. Hope you can find something useful.

Happy coding !!!!

Tuesday, July 9, 2019

Bitbucket pipelines CI/CD integration for android project

Date : 08/07/2019

Hi,

Recently I have been assigned to a new android project and I got the opportunity to integrate CI/CD to this project. I was first searched how to do this with bitbucket, because this project was planned to use bitbucket from the day 1. Even though there were many articles and blogs on how to do this I only found few on android integration. And those articles were 2 or 3 years old and/or not having a complete guide.

So I have to get my hands dirty :) and had to find a solution which works for my project. Here are the steps I had to do for CI/CD integration with bitbucket.

1. Create a repo in Bitbucket
2. Create a pipeline for the project (Bitbuckets' way to do CI/CD)
     There is a selection item called "Pipelines" at the left side panel.


   Select Java(Gradle) to generate bitbucket-pipelines.yml file. We are going to edit this file later.


3. Edit bitbucket-pipeline.yml file to test CI

   First open bitbucket-pipeline.yml file in Android Studio or you can edit it online. But I prefer Android Studio because it makes alignments clear.
You need a docker image which contains latest build environment for android. Goto dockerhub and select appropriate one that have your environment requirement, In my case I selected mingc docker image because latest android SDK and Kotlin support.

Change the first line to get docker image

image: mingc/android-build-box:latest

Edit "pipelines" area to integrate CI as follows.


pipelines:
  default:
    - step:
        caches:
          - gradle
        script:
          - chmod +x gradlew
          - echo 'inside default branch. tests should run now.'
          - ./gradlew test
  branches:
    development:
      - step:
          caches:
            - gradle
          script:
            - echo 'development branch building. tests should run now.'
            - chmod +x gradlew
            - ./gradlew test


default tag means if you haven't declare any specific script for a branch, it will run default. As for above case the default script will run if we push a code to master branch or any other feature branch but it will not run if we push a code to development branch. Because there is a script to run if we push to development branch. As per above file gradle will execute unit test for development branch and for any branch that is not defined in the script.

Now I need to run some script when I create a PR (pull request) to master branch.

pull-requests:
  development:
    - step:
        caches:
          - gradle
        script:
          - echo 'PR Script running'
          # - ./gradlew assembleDebug


When PR is accepted the code change will merge to master branch. And that process will run default script since we didn't declare any script for master branch. So I will add a scrip to run when there is a change to master branch.

master:
  - step:
      caches:
        - gradle
      name: Test and build apk
      script:
        - echo 'master branch building.'
        - chmod +x gradlew
        - ./gradlew test
        - ./gradlew assembleRelease


This script is for create a release apk but we need to sign the apk in order to install on a device or distribute on Google play store. For this you need to change the app level gradle file and include keystore file which contains relevant keys.
Now create a keystore file and a keyAlias. Put this jks file on application root folder (where your app build.gradle file resides). Then change app build.gradle file as follows.

android {
    compileSdkVersion 28    defaultConfig {
        applicationId "****.****.****"        minSdkVersion 19        targetSdkVersion 28        versionCode 1        versionName "1.0"
    }
    signingConfigs {
        release {
            // You need to specify either an absolute path or include the            // keystore file in the same directory as the build.gradle file.            storeFile file("**********.jks")
            storePassword "*********"            keyAlias "*********"            keyPassword "**********"            v1SigningEnabled true            v2SigningEnabled true        }
    }
    buildTypes {
        release {
            signingConfig signingConfigs.release            minifyEnabled false            proguardFiles getDefaultProguardFile('proguard-android-optimize.txt'), 'proguard-rules.pro'        }
    }
}

Now when there is a change in master branch it will run the test and create a release apk. You can't see the release apk in Bitbucket files. To see the apk you need to define an artifact. Add following code after script tag in master tag.

artifacts:
  - app/release/app-release.apk


After master branch build you will see "Artifacts" tab next to "Build".


Currently this generated artifact will remain for 7 days. To save it permanently in "Downloads" you need to do some additional work. I'll describe them under CD since after saving this release apk we are going to send it  to test users via Slack.

4. Edit bitbucket-pipeline.yml file to test CD

Following image shows the download area in Btbucket.


To write a file in this location you need "App password". Select your image at the bottom left and go to "Bitbucket settings". There you can create app password. Give it a name and enable repositories write permission. Save the generated password because we need it later.


Now we will create repository variable to hold our username and newly generated app password. We need this variable to write the apk to downloads.

Select Settings -> Repository variables


Add new variable. Name is BB_AUTH_STRING and value is YOUR_USERNAME:APP_PASSWORD (This is where we use our saved app password)
eg: mark_twein:7ax3848XYu93933

Then add the following line to master tag.
- curl -X POST "https://${BB_AUTH_STRING}@api.bitbucket.org/2.0/repositories/${BITBUCKET_REPO_OWNER}/${BITBUCKET_REPO_SLUG}/downloads" --form files=@"./app/build/outputs/apk/release/app-release.apk"

Here BITBUCKET_REPO_OWNER  and BITBUCKET_REPO_SLUG default repository variables. Don't worry about that.
So the master tag will now look like below.

master:
  - step:
      caches:
        - gradle
      name: Test and build apk
      script:
        - echo 'master branch building.'
        - chmod +x gradlew
        - ./gradlew test
        - ./gradlew assembleRelease
        - curl -X POST "https://${BB_AUTH_STRING}@api.bitbucket.org/2.0/repositories/${BITBUCKET_REPO_OWNER}/${BITBUCKET_REPO_SLUG}/downloads" --form files=@"./app/build/outputs/apk/release/app-release.apk"
        
      artifacts:
        - app/release/app-release.apk


Now when you push a change to master branch you will find a release apk in the "Downloads" location.

5. Edit bitbucket-pipeline.yml file to send apk to a slack channel

Finally we are going to publish our apk to Slack channel.

For this first go to this link and when you are scrolling down you will see legacy token generator section. Create a token there and save it.

Then Create a new repository variable in Bitbucket. You may name this as "SLACK_TOKEN" and for the value put the generated token value.

Add the following code to master tag.

- curl -F file=@"./app/build/outputs/apk/release/app-release.apk" -F channels=your_channel_name -F token=${SLACK_TOKEN} https://slack.com/api/files.upload

put the channel name where you need to publish the apk.

Here is the final code.


master:
  - step:
      caches:
        - gradle
      name: Test and build apk
      script:
        - echo 'master branch building.'
        - chmod +x gradlew
        - ./gradlew test
        - ./gradlew assembleRelease
        - curl -X POST "https://${BB_AUTH_STRING}@api.bitbucket.org/2.0/repositories/${BITBUCKET_REPO_OWNER}/${BITBUCKET_REPO_SLUG}/downloads" --form files=@"./app/build/outputs/apk/release/app-release.apk"
        - curl -F file=@"./app/build/outputs/apk/release/app-release.apk" -F channels=your_channel_name -F token=${SLACK_TOKEN} https://slack.com/api/files.upload
      artifacts:
        - app/release/app-release.apk


Now when you push the code to development bran the tests will execute. Then you make a PR and your lead approves the PR and development branch merge into master branch. This executes test and make a app-release.apk and put it into downloads area in bitbucket. After that the generated apk will publish into the selected channel where test users can install that to their phones.

phew..... Now that's it from my side. I hope you can take something from this article. I will list some useful links below.
Happy Coding :)


Some useful links

https://proandroiddev.com/bitbucket-pipelines-android-6eeff631f2eb
https://confluence.atlassian.com/bitbucket/get-started-with-bitbucket-pipelines-792298921.html
https://github.com/kigen/bitbucket-pipelines-android
https://api.slack.com/custom-integrations/legacy-tokens
https://confluence.atlassian.com/bitbucket/deploy-build-artifacts-to-bitbucket-downloads-872124574.html
https://confluence.atlassian.com/bitbucket/variables-in-pipelines-794502608.html