Saturday, September 14, 2019

Sentry integration to an Android application - Sentry logging

Date : 14 / 09 / 2019

Hi,

In my recent project I had to integrate logging mechanism for the android project. Although I have used Google Analytics, Crashlytics and Appcenter Analytics it was not enough for this project. Because the administer should be provided with a one-stop dashboard for view both android app and backend server errors.

So we implemented sentry for both backend and android app. The documentation is not giving enough information so I'm writing this blog to easily integrate Sentry to your android project.

First implement following libraries in your app.gradle file, inside dependencies block.

//sentry loggingimplementation 'io.sentry:sentry-android:1.7.27'
implementation 'io.sentry:sentry-logback:1.7.27'

The sentry-android is of cause for integrating sentry to android, and the sentry-logback is for capture and send log report to the sentry. We can ignore this sentry-logback and use ,

try(exception: Exception){
  // some code which returns exception 
}catch { 
  Sentry.capture(exception) 
}

But this only capture exceptions. We need more than that. we need info, warning, errors and get that stacktrace. That's why we use sentry-logback. There are many substitute libraries like Timber, Log4j and many others. You can try them too. 

Next click src -> main. Right click on main folder, then New -> Directory. Name it as "resources". This name is important because by default Sentry is looking at this directory to get values. Create logback.xml and sentry.properties files inside this directory.
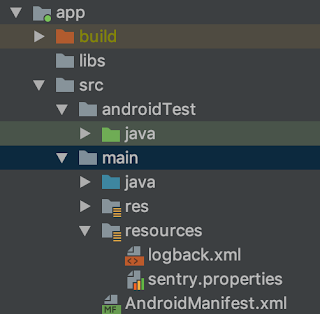


You need url to put inside sentry.properties file. I think you already created a Sentry project. You can have multiple projects inside a project. Let's say We have a project called SamProj. Inside it we have AndroidSamp and WebSamp. Goto settings in SamProj. select projects tab -> select AndroidSamp. Then select Client Keys (DSN). Copy that DSN.

paste your dsn code in your sentry.properties file as below. following code is just a sample.

dsn=https://asdadadddada333444sdfsdfsdfe@sentry.io/234234435
anr.enabled = true

Next in logback.xml paste the following code. You can use this as it is. 


<configuration>    <!-- Configure the Console appender -->    <appender name="Console" class="ch.qos.logback.core.ConsoleAppender">        <encoder>            <pattern>%d{HH:mm:ss.SSS} [%thread] %-5level %logger{36} - %msg%n</pattern>        </encoder>    </appender>
    <!-- Configure the Sentry appender, overriding the logging threshold to the WARN level -->    <appender name="Sentry" class="io.sentry.logback.SentryAppender">        <filter class="ch.qos.logback.classic.filter.ThresholdFilter">            <level>INFO</level>        </filter>    </appender>
    <!-- Enable the Console and Sentry appenders, Console is provided as an example of a non-Sentry logger that is set to a different logging threshold -->    <root level="INFO">        <appender-ref ref="Console" />        <appender-ref ref="Sentry" />    </root></configuration>


Ok. Now configuration part is done. Let's move to the codes.

There was a requirement to get logs separately by environment. Which means by Production environment(actual user devices) and development environment(test devices). So we created a gradle build config variable for that purpose.

In app.gradle,


buildTypes {
    release {
        it.buildConfigField 'String', "ENVIRONMENT", '"release"'    }
    debug {
        it.buildConfigField 'String', "ENVIRONMENT", '"development"'    }
}


Create an Application class, and paste the following code.

class MainApplication: Application() {
    override fun onCreate() {
        super.onCreate()
        Sentry.init(AndroidSentryClientFactory(this))
        Sentry.getStoredClient().environment = BuildConfig.ENVIRONMENT    }
}

Don't forget to register this application class in your manifest file.

<application
android:name=".MainApplication">

Next create a BaseActivity. All your other activities must extend from this class so we can change one file and that change will propagate to child classes. If not you can directly code in your activity classes but that's not a good practice since then every time you are duplicating codes.


open class BaseActivity: AppCompatActivity() {

    private val logger = LoggerFactory.getLogger(this::class.java.simpleName)

    fun logApplicationError(error: String){
        logger.error(error)
    }

    fun logApplicationException(error: Exception){
        logger.error("Exception caught", error)
    }

    fun logApplicationInfo(info: String){
        logger.info(info)
    }

}

Now all you have to do is call these methods from your child activities and if any error or exception occurs, It will send that log to Sentry.


class QRCodeActivity : BaseActivity() { // make sure to extend from BaseActivity

private fun textToQRImage(text: String): Bitmap? {
    val bitMatrix: BitMatrix
    try {
        bitMatrix = MultiFormatWriter().encode(
            text,            BarcodeFormat.QR_CODE,            QRCodeSize, QRCodeSize, null        )

    } catch (exception: IllegalArgumentException) {
        logApplicationException(exception)
        return null    }
}

}


That's it. Now in your Sentry dashboard, you can filter error logs by environment with other data when errors happens and take necessary actions. There is a section in Sentry documentation that we should add another library with related to ProGuard.
https://docs.sentry.io/clients/java/integrations/#proguard

I still didn't use this and if anyone know what is the use of this please tell us in the comment section. I will update this blog when I got my hands dirty with sentry proguard integration.

That's it. Hope you can find something useful.

Happy coding !!!!

Tuesday, July 9, 2019

Bitbucket pipelines CI/CD integration for android project

Date : 08/07/2019

Hi,

Recently I have been assigned to a new android project and I got the opportunity to integrate CI/CD to this project. I was first searched how to do this with bitbucket, because this project was planned to use bitbucket from the day 1. Even though there were many articles and blogs on how to do this I only found few on android integration. And those articles were 2 or 3 years old and/or not having a complete guide.

So I have to get my hands dirty :) and had to find a solution which works for my project. Here are the steps I had to do for CI/CD integration with bitbucket.

1. Create a repo in Bitbucket
2. Create a pipeline for the project (Bitbuckets' way to do CI/CD)
     There is a selection item called "Pipelines" at the left side panel.


   Select Java(Gradle) to generate bitbucket-pipelines.yml file. We are going to edit this file later.


3. Edit bitbucket-pipeline.yml file to test CI

   First open bitbucket-pipeline.yml file in Android Studio or you can edit it online. But I prefer Android Studio because it makes alignments clear.
You need a docker image which contains latest build environment for android. Goto dockerhub and select appropriate one that have your environment requirement, In my case I selected mingc docker image because latest android SDK and Kotlin support.

Change the first line to get docker image

image: mingc/android-build-box:latest

Edit "pipelines" area to integrate CI as follows.


pipelines:
  default:
    - step:
        caches:
          - gradle
        script:
          - chmod +x gradlew
          - echo 'inside default branch. tests should run now.'
          - ./gradlew test
  branches:
    development:
      - step:
          caches:
            - gradle
          script:
            - echo 'development branch building. tests should run now.'
            - chmod +x gradlew
            - ./gradlew test


default tag means if you haven't declare any specific script for a branch, it will run default. As for above case the default script will run if we push a code to master branch or any other feature branch but it will not run if we push a code to development branch. Because there is a script to run if we push to development branch. As per above file gradle will execute unit test for development branch and for any branch that is not defined in the script.

Now I need to run some script when I create a PR (pull request) to master branch.

pull-requests:
  development:
    - step:
        caches:
          - gradle
        script:
          - echo 'PR Script running'
          # - ./gradlew assembleDebug


When PR is accepted the code change will merge to master branch. And that process will run default script since we didn't declare any script for master branch. So I will add a scrip to run when there is a change to master branch.

master:
  - step:
      caches:
        - gradle
      name: Test and build apk
      script:
        - echo 'master branch building.'
        - chmod +x gradlew
        - ./gradlew test
        - ./gradlew assembleRelease


This script is for create a release apk but we need to sign the apk in order to install on a device or distribute on Google play store. For this you need to change the app level gradle file and include keystore file which contains relevant keys.
Now create a keystore file and a keyAlias. Put this jks file on application root folder (where your app build.gradle file resides). Then change app build.gradle file as follows.

android {
    compileSdkVersion 28    defaultConfig {
        applicationId "****.****.****"        minSdkVersion 19        targetSdkVersion 28        versionCode 1        versionName "1.0"
    }
    signingConfigs {
        release {
            // You need to specify either an absolute path or include the            // keystore file in the same directory as the build.gradle file.            storeFile file("**********.jks")
            storePassword "*********"            keyAlias "*********"            keyPassword "**********"            v1SigningEnabled true            v2SigningEnabled true        }
    }
    buildTypes {
        release {
            signingConfig signingConfigs.release            minifyEnabled false            proguardFiles getDefaultProguardFile('proguard-android-optimize.txt'), 'proguard-rules.pro'        }
    }
}

Now when there is a change in master branch it will run the test and create a release apk. You can't see the release apk in Bitbucket files. To see the apk you need to define an artifact. Add following code after script tag in master tag.

artifacts:
  - app/release/app-release.apk


After master branch build you will see "Artifacts" tab next to "Build".


Currently this generated artifact will remain for 7 days. To save it permanently in "Downloads" you need to do some additional work. I'll describe them under CD since after saving this release apk we are going to send it  to test users via Slack.

4. Edit bitbucket-pipeline.yml file to test CD

Following image shows the download area in Btbucket.


To write a file in this location you need "App password". Select your image at the bottom left and go to "Bitbucket settings". There you can create app password. Give it a name and enable repositories write permission. Save the generated password because we need it later.


Now we will create repository variable to hold our username and newly generated app password. We need this variable to write the apk to downloads.

Select Settings -> Repository variables


Add new variable. Name is BB_AUTH_STRING and value is YOUR_USERNAME:APP_PASSWORD (This is where we use our saved app password)
eg: mark_twein:7ax3848XYu93933

Then add the following line to master tag.
- curl -X POST "https://${BB_AUTH_STRING}@api.bitbucket.org/2.0/repositories/${BITBUCKET_REPO_OWNER}/${BITBUCKET_REPO_SLUG}/downloads" --form files=@"./app/build/outputs/apk/release/app-release.apk"

Here BITBUCKET_REPO_OWNER  and BITBUCKET_REPO_SLUG default repository variables. Don't worry about that.
So the master tag will now look like below.

master:
  - step:
      caches:
        - gradle
      name: Test and build apk
      script:
        - echo 'master branch building.'
        - chmod +x gradlew
        - ./gradlew test
        - ./gradlew assembleRelease
        - curl -X POST "https://${BB_AUTH_STRING}@api.bitbucket.org/2.0/repositories/${BITBUCKET_REPO_OWNER}/${BITBUCKET_REPO_SLUG}/downloads" --form files=@"./app/build/outputs/apk/release/app-release.apk"
        
      artifacts:
        - app/release/app-release.apk


Now when you push a change to master branch you will find a release apk in the "Downloads" location.

5. Edit bitbucket-pipeline.yml file to send apk to a slack channel

Finally we are going to publish our apk to Slack channel.

For this first go to this link and when you are scrolling down you will see legacy token generator section. Create a token there and save it.

Then Create a new repository variable in Bitbucket. You may name this as "SLACK_TOKEN" and for the value put the generated token value.

Add the following code to master tag.

- curl -F file=@"./app/build/outputs/apk/release/app-release.apk" -F channels=your_channel_name -F token=${SLACK_TOKEN} https://slack.com/api/files.upload

put the channel name where you need to publish the apk.

Here is the final code.


master:
  - step:
      caches:
        - gradle
      name: Test and build apk
      script:
        - echo 'master branch building.'
        - chmod +x gradlew
        - ./gradlew test
        - ./gradlew assembleRelease
        - curl -X POST "https://${BB_AUTH_STRING}@api.bitbucket.org/2.0/repositories/${BITBUCKET_REPO_OWNER}/${BITBUCKET_REPO_SLUG}/downloads" --form files=@"./app/build/outputs/apk/release/app-release.apk"
        - curl -F file=@"./app/build/outputs/apk/release/app-release.apk" -F channels=your_channel_name -F token=${SLACK_TOKEN} https://slack.com/api/files.upload
      artifacts:
        - app/release/app-release.apk


Now when you push the code to development bran the tests will execute. Then you make a PR and your lead approves the PR and development branch merge into master branch. This executes test and make a app-release.apk and put it into downloads area in bitbucket. After that the generated apk will publish into the selected channel where test users can install that to their phones.

phew..... Now that's it from my side. I hope you can take something from this article. I will list some useful links below.
Happy Coding :)


Some useful links

https://proandroiddev.com/bitbucket-pipelines-android-6eeff631f2eb
https://confluence.atlassian.com/bitbucket/get-started-with-bitbucket-pipelines-792298921.html
https://github.com/kigen/bitbucket-pipelines-android
https://api.slack.com/custom-integrations/legacy-tokens
https://confluence.atlassian.com/bitbucket/deploy-build-artifacts-to-bitbucket-downloads-872124574.html
https://confluence.atlassian.com/bitbucket/variables-in-pipelines-794502608.html

Monday, November 26, 2018

Android fingerprint sensor dialog translations

Date : 27 / 11 / 2018

HI,

As part of my project I was assigned to implement fingerprint authentication to android app. Since this app should support different countries I had to add the translations text to this dialog also. That's where I encountered a problem which took me more time than I expected. Although Setting title, subtitle and few other messages were easy, setting few strings were not easy as I thought.

This is the easy part.

 val biometricPromptInfo = BiometricPrompt.PromptInfo.Builder()  
         .setTitle("Main Title")  
         .setSubtitle("Here is subtitle")  
         .setDescription("This is the description")  
         .setNegativeButtonText(getString(R.string.cancel))  
         .build()  

Which gives us following dialog prompt.


We can surely add the translations for all the gives setters. But I couldn't get a setter for "Touch the fingerprint sensor". This is where I began to search how could I change this text and add translation for that text. Since there was no search result for this particular problem in internet, I searched in the android files. I found the string value for this TextView which is highlighted, in a generated file located in
C:\Users\yourName\AppName\app\build\generated\not_namespaced_r_class_sources\debug\processDebugResources\r\androidx\biometric.


so the rest was easy. I have added string with same id with desired values  in mu strings.xml files.

Later I also found this link on github which could be useful.

Hope this is useful to someone.

Happy coding :) ......


Wednesday, November 14, 2018

Andorid - Getting error response body with retrofit and moshi using kotlin

Date : 15 / 11 / 2018

Hi,

Recently I was assigned to get a response error object using retrofit. Although there were some artciles and SO questions regard to this, I hardly find a usage  of  Kotlin, Retrofit and Moshi combination. Therefore I am writing this blog how to use this combination.
(I'm showing my actual working code here and the code should be self-explanatory. I am putting notes under every code snippet where necessary and explain a bit more)

So this is the response which I get when something goes wrong.


Here is the error response class which is reusable.

 @JsonClass(generateAdapter = true)  
 data class BaseResponse<T>(  
     @Json(name = "statusCode") val statusCode: Int,  
     @Json(name = "result") val result: T? = null,  
     @Json(name = "errorCode") val errorCode: String? = null  
 )  

Here is the JsonParser class which is responsible for json converting.

 class JsonParser {  
   fun moshi() = Moshi.Builder().build()  
   inline fun <reified T> toBaseResponseError(json: BufferedSource): BaseResponse<T>? {  
     return BaseResponseJsonAdapter<T>(moshi(), arrayOf(T::class.java)).fromJson(json)  
   }  
  // other json converters  
 }  

Here is how to use that error response converter object.

 Service(this, Utils().getAccessToken(this)).getUser(  
       object : retrofit2.Callback<BaseResponse<HealthPersonInfo>> {  
         override fun onFailure(call: Call<BaseResponse<HealthPersonInfo>>, t: Throwable) {  
           hideProgress()  
         }  
         override fun onResponse(  
           call: Call<BaseResponse<HealthPersonInfo>>,  
           response: Response<BaseResponse<HealthPersonInfo>>  
         ) {  
           hideProgress()  
           if (response.isSuccessful) {  
             response.body()?.let {  
                // do what you need when the call is success  
             }  
           } else {  
             response.errorBody()?.let {  
               val errorResponse = JsonParser().toBaseResponseError<HealthPersonInfo>(it.source())  
               // now you have an error object(errorResponse ) and you can use it's properties as follows  
               val code = errorResponse?.errorCode  
             }  
           }  
         }  
       })  

Note : The "Service" class is responsible for creating retrofit builder. It has methods like "getUser" which constructs get user url and callback. "HealthPersonInfo" is a class which is used when we have a successful return.


Hope you can get something helpful. Happy coding!!!


Wednesday, October 17, 2018

How to get frame rate (FPS) and number of frames programmatically from a video in Android

17th of October, 2018.

Yesterday I was assigned to get metadata (width, height, frame rate and no of frames)  of a video recorded by camera. I have gone through many articles and stackoverflow answers, but none of them have fully covered what I want. After playing with android framework I manged to complete my assignment. I will show you what I  have learned.

What I need was either number of frames or frame rate. If I have one then I can calculate other because I have the video length.
 First I tried to use MediaPlayer class. There were 2 promising methods in this class.

 val mediaPlayer: MediaPlayer = MediaPlayer.create(context, uri)  
 val frames = mediaPlayer.metrics.get(MediaPlayer.MetricsConstants.FRAMES)  

However this method requires api level 28. My minimum api level was 21 so this was not going to work. There was also another method call,

 val frameRate = mediaPlayer.syncParams.frameRate  

However this always returns null for me. I wasn't eager to chase this around because I had another promising class which named MediaMetadataRetriever.

 val retriever = MediaMetadataRetriever()  
 val frameRate = retriever.extractMetadata(MediaMetadataRetriever.METADATA_KEY_CAPTURE_FRAMERATE)  

However this method also requires android api level 23 and also it returns me null.

Finally I found MediaExtractor class which is compatible with android api level 16 and gives me what I want.

 private fun getVideoMetaData(uri: Uri) : VideoMetaData{  
     val mediaExtractor = MediaExtractor()  
     mediaExtractor.setDataSource(uri.path)  
     val format = mediaExtractor.getTrackFormat(0)  
     mediaExtractor.release()  
     return if(format.containsKey(MediaFormat.KEY_FRAME_RATE)){  
       val frameRate = format.getInteger(MediaFormat.KEY_FRAME_RATE)  
       val frames = frameRate * (format.getLong(MediaFormat.KEY_DURATION)/ 1000000)  
       VideoMetaData(format.getInteger(MediaFormat.KEY_WIDTH).toString(),  
           format.getInteger(MediaFormat.KEY_HEIGHT).toString(),  
           frames.toString(),  
           frameRate.toString())  
     }else {  
       VideoMetaData(format.getInteger(MediaFormat.KEY_WIDTH).toString(), format.getInteger(MediaFormat.KEY_HEIGHT).toString())  
     }  
   }  

** VideoMetaData is a simple data class

So that's it. Hope this will be a help for someone.
:-)


Monday, December 11, 2017

Android ViewPager detect swipe beyond bounds and go to next activity.

Date : 11 / 12 / 2017

Today my client wants me to automatically open the next view(next activity) when the user comes to the last page and swipe left. I have searched and found good solutions on SO but they seems to be complex than I thought. So I looked and played with some methods in ViewPager and created an easy solution.

I used  OnPageChangeListener in  ViewPager  class. Here we have 3 methods.


  1. void onPageScrolled(int position, float positionOffset, int positionOffsetPixels)
  2. void onPageSelected(int position);
  3. void onPageScrollStateChanged(int state);
We are going to use onPageSelected() and onPageScrollStateChanged() for our purpose.

It is important to know what are the states in  onPageScrollStateChanged() and their sequence of execution.There are 3 states as SCROLL_STATE_IDLE, SCROLL_STATE_DRAGGING and SCROLL_STATE_SETTLING.

This is extracted from android documentation.
/** * Called when the scroll state changes. Useful for discovering when the user 
* begins dragging, when the pager is automatically settling to the current page, 
* or when it is fully stopped/idle. 
* * @param state The new scroll state. 
* @see ViewPager#SCROLL_STATE_IDLE 
* @see ViewPager#SCROLL_STATE_DRAGGING 
* @see ViewPager#SCROLL_STATE_SETTLING */
void onPageScrollStateChanged(int state);

Here is the execution order.
Scroll_state_dragging --> Scroll_state_settling --> onPageSelected() --> Scroll_state_idle

(note: scroll_state_dragging occur multiple times.)

The idea is keeping a flag inside onPageSelected() to record current page number. Then if user in the last page and swipe left scroll_state_dragging called and launch the next view.

private int pagePosition; // keep a class variable
private int[] layouts= new int[]{
        R.layout.welcome_slide1,
        R.layout.welcome_slide2,
        R.layout.welcome_slide3}; 
ViewPager.OnPageChangeListener viewPagerPageChangeListener = new ViewPager.OnPageChangeListener() {

    @Override   
    public void onPageSelected(int position) {
        addBottomDots(position);
        pagePosition = position;
    }

    @Override 
    public void onPageScrolled(int position, float positionOffset, int arg2) {
    }

    @Override   
    public void onPageScrollStateChanged(int state) {
        if (state == ViewPager.SCROLL_STATE_DRAGGING) {
            if (pagePosition == layouts.length - 1) {
                launchHomeScreen();
            }
        }
    }
};
private void launchHomeScreen() {
    startActivity(new Intent(IntroductionActivity.this, MainDockerActivity.class));
    finish();
}

Easy as that. Here is my full code implementation. (filter for what you want.)

 package com.YOURAPP.android.app;  
 import android.content.Context;  
 import android.content.Intent;  
 import android.graphics.Color;  
 import android.graphics.Typeface;  
 import android.os.Build;  
 import android.os.Bundle;  
 import android.support.v4.content.res.ResourcesCompat;  
 import android.support.v4.view.PagerAdapter;  
 import android.support.v4.view.ViewPager;  
 import android.text.Html;  
 import android.view.LayoutInflater;  
 import android.view.View;  
 import android.view.ViewGroup;  
 import android.view.Window;  
 import android.view.WindowManager;  
 import android.widget.Button;  
 import android.widget.LinearLayout;  
 import android.widget.TextView;  
 import butterknife.BindView;  
 public class IntroductionActivity extends BaseActivity {  
   @BindView(R.id.view_pager_intro)  
   ViewPager viewPager;  
   @BindView(R.id.btn_skip)  
   Button btnSkip;  
   private LinearLayout dotsLayout;  
   private int[] layouts;  
   private Typeface typefaceNormal;  
   private Typeface typefaceBold;  
   private int pagePosition;  
   @Override  
   protected void onCreate(Bundle savedInstanceState) {  
     super.onCreate(savedInstanceState);  
     if (Build.VERSION.SDK_INT >= 21) {  
       getWindow().getDecorView().setSystemUiVisibility(View.SYSTEM_UI_FLAG_LAYOUT_STABLE | View.SYSTEM_UI_FLAG_LAYOUT_FULLSCREEN);  
     }  
     dotsLayout = findViewById(R.id.layoutDots);  
     layouts = new int[]{  
         R.layout.welcome_slide1,  
         R.layout.welcome_slide2,  
         R.layout.welcome_slide3};  
     typefaceNormal = ResourcesCompat.getFont(this, R.font.gill_sans_book);  
     typefaceBold = ResourcesCompat.getFont(this, R.font.gill_sans_bold);  
     addBottomDots(0);  
     // making notification bar transparent  
     changeStatusBarColor();  
     MyViewPagerAdapter myViewPagerAdapter = new MyViewPagerAdapter();  
     viewPager.setAdapter(myViewPagerAdapter);  
     viewPager.addOnPageChangeListener(viewPagerPageChangeListener);  
     btnSkip.setOnClickListener(new View.OnClickListener() {  
       @Override  
       public void onClick(View v) {  
         launchHomeScreen();  
       }  
     });  
   }  
   @Override  
   protected int getContentView() {  
     return R.layout.activity_introduction;  
   }  
   private void addBottomDots(int currentPage) {  
     TextView[] dots = new TextView[layouts.length];  
     int[] colorsActive = getResources().getIntArray(R.array.array_dot_active);  
     int[] colorsInactive = getResources().getIntArray(R.array.array_dot_inactive);  
     dotsLayout.removeAllViews();  
     for (int i = 0; i < dots.length; i++) {  
       dots[i] = new TextView(this);  
       dots[i].setText(Html.fromHtml("&#8226;"));  
       dots[i].setTextSize(35);  
       dots[i].setTextColor(colorsInactive[currentPage]);  
       dotsLayout.addView(dots[i]);  
     }  
     if (dots.length > 0)  
       dots[currentPage].setTextColor(colorsActive[currentPage]);  
   }  
   private int getItem(int i) {  
     return viewPager.getCurrentItem() + i;  
   }  
   private void launchHomeScreen() {  
     startActivity(new Intent(IntroductionActivity.this, MainDockerActivity.class));  
     finish();  
   }  
   ViewPager.OnPageChangeListener viewPagerPageChangeListener = new ViewPager.OnPageChangeListener() {  
     @Override  
     public void onPageSelected(int position) {  
       addBottomDots(position);  
       pagePosition = position;  
     }  
     @Override  
     public void onPageScrolled(int position, float positionOffset, int arg2) {  
     }  
     @Override  
     public void onPageScrollStateChanged(int state) {  
       if (state == ViewPager.SCROLL_STATE_DRAGGING) {  
         if (pagePosition == layouts.length - 1) {  
           launchHomeScreen();  
         }  
       }  
     }  
   };  
   //Making notification bar transparent  
   private void changeStatusBarColor() {  
     if (Build.VERSION.SDK_INT >= Build.VERSION_CODES.LOLLIPOP) {  
       Window window = getWindow();  
       window.addFlags(WindowManager.LayoutParams.FLAG_DRAWS_SYSTEM_BAR_BACKGROUNDS);  
       window.setStatusBarColor(Color.TRANSPARENT);  
     }  
   }  
   public class MyViewPagerAdapter extends PagerAdapter {  
     private LayoutInflater layoutInflater;  
     public MyViewPagerAdapter() {  
     }  
     @Override  
     public Object instantiateItem(ViewGroup container, int position) {  
       layoutInflater = (LayoutInflater) getSystemService(Context.LAYOUT_INFLATER_SERVICE);  
       View view = layoutInflater.inflate(layouts[position], container, false);  
       TextView mainTitle = view.findViewById(R.id.main_title);  
       TextView introDescription = view.findViewById(R.id.intro_description);  
       mainTitle.setTypeface(typefaceBold);  
       introDescription.setTypeface(typefaceNormal);  
       container.addView(view);  
       return view;  
     }  
     @Override  
     public int getCount() {  
       return layouts.length;  
     }  
     @Override  
     public boolean isViewFromObject(View view, Object obj) {  
       return view.equals(obj);  
     }  
     @Override  
     public void destroyItem(ViewGroup container, int position, Object object) {  
       View view = (View) object;  
       container.removeView(view);  
     }  
   }  
 }  

Hope It will be useful to someone. Happy Coding :-)

Wednesday, February 24, 2016

Common template for any android project (Multi screens support)

OutDated : Do not use this! There are better ways which android OS provides.

Hi All,

As I learn more about android, I have a need to create a common android project so  that I can use it to start the future projects which is surly easy my life. Any android project needs to support both phone and tablets for a flexible UI. So we need fragments (as google recommends) and code logic to handle multiple device support.

I'm going to show you my common project to begin for any android project which supports phones and tablets. I created this project referring developer site for android. But here I think my example will easier to read and understand. And yes, I'm still learning android so if you see any issue or things to improve, please comment. I'll really appreciate it.

Here's how my common template look like in phone and tablet.


Let's see the codes. Here's the project structure.


I put comments in the code so it should be self-explanatory.

1. AndroidManifest.xml
 <?xml version="1.0" encoding="utf-8"?>  
 <manifest xmlns:android="http://schemas.android.com/apk/res/android"  
   package="com.sajithkumara.flexibletemplate" >  
   <application  
     android:allowBackup="true"  
     android:icon="@mipmap/ic_launcher"  
     android:label="@string/app_name"  
     android:supportsRtl="true"  
     android:theme="@style/AppTheme" >  
     <activity android:name=".activity.MainActivity" >  
       <intent-filter>  
         <action android:name="android.intent.action.MAIN" />  
         <category android:name="android.intent.category.LAUNCHER" />  
       </intent-filter>  
     </activity>  
     <activity android:name=".activity.BMIActivity"></activity>  
     <activity android:name=".activity.BMRActivity"></activity>  
   </application>  
 </manifest>  

2.build.gradle (Module: app)
 apply plugin: 'com.android.application'  
 android {  
   compileSdkVersion 22  
   buildToolsVersion "22.0.1"  
   defaultConfig {  
     applicationId "com.sajithkumara.flexibletemplate"  
     minSdkVersion 16  
     targetSdkVersion 22  
     versionCode 1  
     versionName "1.0"  
   }  
   buildTypes {  
     release {  
       minifyEnabled false  
       proguardFiles getDefaultProguardFile('proguard-android.txt'), 'proguard-rules.pro'  
     }  
   }  
 }  
 dependencies {  
   compile fileTree(dir: 'libs', include: ['*.jar'])  
   testCompile 'junit:junit:4.12'  
   compile 'com.android.support:appcompat-v7:22.2.1'  
   compile 'com.android.support:cardview-v7:22.2.1'  
 }  

3. MainActivity
 package com.sajithkumara.flexibletemplate.activity;  
 import android.content.Intent;  
 import android.support.v4.app.Fragment;  
 import android.support.v4.app.FragmentTransaction;  
 import android.os.Bundle;  
 import android.support.v7.app.AppCompatActivity;  
 import android.widget.FrameLayout;  
 import com.sajithkumara.flexibletemplate.R;  
 import com.sajithkumara.flexibletemplate.fragment.BMIFragment;  
 import com.sajithkumara.flexibletemplate.fragment.BMRFragment;  
 import com.sajithkumara.flexibletemplate.fragment.MenuFragment;  
 // this is the first view which includes MenuFragment  
 public class MainActivity extends AppCompatActivity implements MenuFragment.OnMenuItemSelectedListener {  
   FrameLayout frameContainer;  
   @Override  
   protected void onCreate(Bundle savedInstanceState) {  
     super.onCreate(savedInstanceState);  
     setContentView(R.layout.activity_main); // there are 2 activity_main.xml files.  
                         // 1 for phones(in layout), a for tablets (in layout-sw600dp)  
     frameContainer = (FrameLayout) findViewById(R.id.frame_container);  
     if (frameContainer == null) {  
       // If we have a phone activity_main.xml in layout folder loads.Do nothing here.  
     } else {  
       // If we have a tablet activity_main.xml in layout-sw600dp folder loads.  
       // load the BMIFragment in the frame_container  
       BMIFragment sef = new BMIFragment();  
       changeFragment(sef); // replace the fragments  
     }  
   }  
   @Override  
   public void onMenuItemSelect(int layoutId) { // Listener interface in MenuFragment  
     Intent intent = null;  
     if (frameContainer == null) { // If we have a phone.......  
       switch (layoutId) { // layoutId pass from MenuFragment  
         case 1: // if layoutId = 1, load BMIActivity(not BMIFragment)  
           intent = new Intent(this, BMIActivity.class);  
           intent.putExtra("layoutId", layoutId);  
           startActivity(intent);  
           return;  
         case 2:// if layoutId = 2, load BMRActivity(not BMRFragment)  
           intent = new Intent(this, BMRActivity.class);  
           startActivity(intent);  
           return;  
       }  
     } else {  // If we have a tablet.......  
       switch (layoutId) {  
         case 1: //load BMIFragment  
           BMIFragment sef = new BMIFragment();  
           changeFragment(sef);  
           return;  
         case 2: //load BMRFragment  
           BMRFragment bmiFragment = new BMRFragment();  
           changeFragment(bmiFragment);  
           return;  
       }  
     }  
   }  
   private void changeFragment(Fragment fragment) {  
     FragmentTransaction fragmentTransaction = null;  
     fragmentTransaction = getSupportFragmentManager().beginTransaction();  
     fragmentTransaction.replace(R.id.frame_container, fragment);  
     fragmentTransaction.commit();  
   }  
 }  

4. BMIActivity
 package com.sajithkumara.flexibletemplate.activity;  
 import android.os.Bundle;  
 import android.support.v7.app.AppCompatActivity;  
 import android.view.MenuItem;  
 import com.sajithkumara.flexibletemplate.R;  
 public class BMIActivity extends AppCompatActivity {  
   // Put all the java controlling code in BMIFragment. No need to code here.  
   @Override  
   protected void onCreate(Bundle savedInstanceState) {  
     super.onCreate(savedInstanceState);  
     setContentView(R.layout.activity_bmi);  
   }  
   @Override  
   public boolean onOptionsItemSelected(MenuItem item) {  
     this.finish(); // end this activity and go back  
     return super.onOptionsItemSelected(item);  
   }  
 }  

5. BMRActivity
 package com.sajithkumara.flexibletemplate.activity;  
 import android.os.Bundle;  
 import android.support.v7.app.AppCompatActivity;  
 import android.view.MenuItem;  
 import com.sajithkumara.flexibletemplate.R;  
 public class BMRActivity extends AppCompatActivity {  
   // Put all the java controlling code in BMRFragment. No need to code here.  
   @Override  
   protected void onCreate(Bundle savedInstanceState) {  
     super.onCreate(savedInstanceState);  
     setContentView(R.layout.activity_bmr);  
   }  
   @Override  
   public boolean onOptionsItemSelected(MenuItem item) {  
     this.finish(); // end this activity and go back  
     return super.onOptionsItemSelected(item);  
   }  
 }  

6. MenuFragment
 package com.sajithkumara.flexibletemplate.fragment;  
 import android.app.Activity;  
 import android.os.Bundle;  
 import android.support.v4.app.Fragment;  
 import android.support.v7.widget.CardView;  
 import android.view.LayoutInflater;  
 import android.view.View;  
 import android.view.ViewGroup;  
 import com.sajithkumara.flexibletemplate.R;  
 public class MenuFragment extends Fragment {  
   private OnMenuItemSelectedListener mListener;  
   CardView cardViewBMI, cardViewBMR;  
   public static MenuFragment newInstance(String param1, String param2) {  
     MenuFragment fragment = new MenuFragment();  
     return fragment;  
   }  
   public MenuFragment() {  
     // Required empty public constructor  
   }  
   @Override  
   public void onCreate(Bundle savedInstanceState) {  
     super.onCreate(savedInstanceState);  
   }  
   @Override  
   public View onCreateView(LayoutInflater inflater, ViewGroup container,  
                Bundle savedInstanceState) {  
     View v = inflater.inflate(R.layout.fragment_menu, container, false);  
     cardViewBMI = (CardView) v.findViewById(R.id.cardBMI);  
     cardViewBMR = (CardView) v.findViewById(R.id.cardBMR);  
     cardViewBMI.setOnClickListener(new View.OnClickListener() {  
       @Override  
       public void onClick(View v) {  
         onMenuItemSelected(1); // layoutId = 1 to identify BMI card view click  
       }  
     });  
     cardViewBMR.setOnClickListener(new View.OnClickListener() {  
       @Override  
       public void onClick(View v) {  
         onMenuItemSelected(2); // layoutId = 2 to identify BMR card view click  
       }  
     });  
     return v;  
   }  
   public void onMenuItemSelected(int layoutId) {  
     if (mListener != null) {  
       mListener.onMenuItemSelect(layoutId);  
     }  
   }  
   @Override  
   public void onAttach(Activity activity) {  
     super.onAttach(activity);  
     try {  
       mListener = (OnMenuItemSelectedListener) activity;  
     } catch (ClassCastException e) {  
       throw new ClassCastException(activity.toString()  
           + " must implement OnMenuItemSelectedListener");  
     }  
   }  
   @Override  
   public void onDetach() {  
     super.onDetach();  
     mListener = null;  
   }  
   public interface OnMenuItemSelectedListener {  
     public void onMenuItemSelect(int layoutId);  
   }  
 }  

7. BMIFragment
 package com.sajithkumara.flexibletemplate.fragment;  
 import android.os.Bundle;  
 import android.support.v4.app.Fragment;  
 import android.support.v7.app.ActionBar;  
 import android.support.v7.app.AppCompatActivity;  
 import android.view.LayoutInflater;  
 import android.view.View;  
 import android.view.ViewGroup;  
 import android.widget.Button;  
 import android.widget.Toast;  
 import com.sajithkumara.flexibletemplate.R;  
 public class BMIFragment extends Fragment {  
   Button btnToast;  
   public BMIFragment() {  
     // Required empty public constructor  
   }  
   @Override  
   public View onCreateView(LayoutInflater inflater, ViewGroup container,  
                Bundle savedInstanceState) {  
     // Inflate the layout for this fragment  
     View v = inflater.inflate(R.layout.fragment_bmi, container, false);  
     //adding action bar and setting backward navigation  
     ActionBar actionBar = ((AppCompatActivity) getActivity()).getSupportActionBar();  
     if (getActivity().getClass().getSimpleName().equals("BMIActivity")) {  
       actionBar.setDisplayHomeAsUpEnabled(true);  
     }  
     actionBar.setTitle("BMI Calculator");  
     btnToast = (Button)v.findViewById(R.id.btnToast);  
     btnToast.setOnClickListener(new View.OnClickListener() {  
       @Override  
       public void onClick(View v) {  
         Toast.makeText(getActivity(),"You clicked toast message button!!!",Toast.LENGTH_SHORT).show();  
       }  
     });  
     return v;  
   }  
 }  

8. BMRFragment
 package com.sajithkumara.flexibletemplate.fragment;  
 import android.os.Bundle;  
 import android.support.v4.app.Fragment;  
 import android.support.v7.app.ActionBar;  
 import android.support.v7.app.AppCompatActivity;  
 import android.view.LayoutInflater;  
 import android.view.View;  
 import android.view.ViewGroup;  
 import com.sajithkumara.flexibletemplate.R;  
 public class BMRFragment extends Fragment {  
   public BMRFragment() {  
     // Required empty public constructor  
   }  
   @Override  
   public View onCreateView(LayoutInflater inflater, ViewGroup container,  
                Bundle savedInstanceState) {  
     // Inflate the layout for this fragment  
     View v = inflater.inflate(R.layout.fragment_bmr, container, false);  
     //adding action bar and setting backward navigation  
     ActionBar actionBar = ((AppCompatActivity) getActivity()).getSupportActionBar();  
     if (getActivity().getClass().getSimpleName().equals("BMRActivity")) {  
       actionBar.setDisplayHomeAsUpEnabled(true);  
     }  
     actionBar.setTitle("BMR Calculator");  
     return v;  
   }  
 }  

9. activity_main.xml (in layout folder)
 <?xml version="1.0" encoding="utf-8"?>  
 <RelativeLayout xmlns:android="http://schemas.android.com/apk/res/android"  
   xmlns:tools="http://schemas.android.com/tools" android:layout_width="match_parent"  
   android:layout_height="match_parent" android:paddingLeft="@dimen/activity_horizontal_margin"  
   android:paddingRight="@dimen/activity_horizontal_margin"  
   android:paddingTop="@dimen/activity_vertical_margin"  
   android:paddingBottom="@dimen/activity_vertical_margin" tools:context=".MainActivity">  
   <fragment  
     android:layout_width="match_parent"  
     android:layout_height="match_parent"  
     android:name="com.sajithkumara.flexibletemplate.fragment.MenuFragment"  
     android:id="@+id/menuFragInActivity"  
     tools:layout="@layout/fragment_menu" />  
 </RelativeLayout>  

10. activity_main.xml (in layout-sw600dp folder)
 <?xml version="1.0" encoding="utf-8"?>  
 <LinearLayout  
   xmlns:android="http://schemas.android.com/apk/res/android"  
   xmlns:tools="http://schemas.android.com/tools"  
   android:layout_width="match_parent"  
   android:layout_height="match_parent"  
   tools:context=".MainActivity">  
   <fragment  
     android:layout_width="0dp"  
     android:layout_weight="1"  
     android:layout_height="match_parent"  
     android:name="com.sajithkumara.flexibletemplate.fragment.MenuFragment"  
     android:id="@+id/menu_fragment"  
     tools:layout="@layout/fragment_menu" />  
   <FrameLayout  
     android:id="@+id/frame_container"  
     android:layout_width="0dp"  
     android:layout_weight="2"  
     android:layout_height="match_parent">  
   </FrameLayout>  
 </LinearLayout>  

11. activity_bmi.xml
 <?xml version="1.0" encoding="utf-8"?>  
 <RelativeLayout xmlns:android="http://schemas.android.com/apk/res/android"  
   xmlns:tools="http://schemas.android.com/tools"  
   android:layout_width="match_parent"  
   android:layout_height="match_parent"  
   tools:context="com.sajithkumara.flexibletemplate.activity.BMIActivity">  
   <fragment  
     android:id="@+id/exersiceFrag"  
     android:name="com.sajithkumara.flexibletemplate.fragment.BMIFragment"  
     android:layout_width="match_parent"  
     android:layout_height="match_parent"  
     tools:layout="@layout/fragment_bmi" />  
   <!-- Note the layout is fragment_bmi-->  
 </RelativeLayout>  

12. activity_bmr.xml
 <?xml version="1.0" encoding="utf-8"?>  
 <RelativeLayout  
   xmlns:android="http://schemas.android.com/apk/res/android"  
   xmlns:tools="http://schemas.android.com/tools"  
   android:layout_width="match_parent"  
   android:layout_height="match_parent"  
   tools:context="com.sajithkumara.flexibletemplate.activity.BMRActivity">  
   <fragment  
     android:layout_width="match_parent"  
     android:layout_height="match_parent"  
     android:name="com.sajithkumara.flexibletemplate.fragment.BMRFragment"  
     android:id="@+id/exersiceFrag"  
     tools:layout="@layout/fragment_bmr"/>  
   <!-- Note the layout is fragment_bmr-->  
 </RelativeLayout>  

13. fragment_bmi.xml
 <FrameLayout xmlns:android="http://schemas.android.com/apk/res/android"  
   xmlns:tools="http://schemas.android.com/tools"  
   android:layout_width="match_parent"  
   android:layout_height="match_parent"  
   android:background="#95a5a6"  
   tools:context="com.sajithkumara.flexibletemplate.fragment.BMIFragment">  
   <TextView  
     android:layout_width="match_parent"  
     android:layout_height="match_parent"  
     android:gravity="center"  
     android:text="Here place the content for BMI calculator"  
     android:textColor="#fff"  
     android:textSize="24sp" />  
   <Button  
     android:id="@+id/btnToast"  
     android:layout_width="wrap_content"  
     android:layout_height="wrap_content"  
     android:text="Toast Message"  
     android:layout_gravity="center_horizontal"  
     android:layout_marginTop="60dp"/>  
 </FrameLayout>  

14. fragment_bmr.xml
 <FrameLayout xmlns:android="http://schemas.android.com/apk/res/android"  
   xmlns:tools="http://schemas.android.com/tools"  
   android:layout_width="match_parent"  
   android:layout_height="match_parent"  
   tools:context="com.sajithkumara.flexibletemplate.fragment.BMRFragment"  
   android:background="#7f8c8d">  
   <TextView  
     android:layout_width="match_parent"  
     android:layout_height="match_parent"  
     android:gravity="center"  
     android:text="BMR Calculator goes here.Place the content for BMR calculator"  
     android:textColor="#fff"  
     android:textSize="24sp" />  
 </FrameLayout>  

15. fragment_menu.xml
 <RelativeLayout xmlns:android="http://schemas.android.com/apk/res/android"  
   xmlns:app="http://schemas.android.com/apk/res-auto"  
   xmlns:tools="http://schemas.android.com/tools"  
   android:layout_width="match_parent"  
   android:layout_height="match_parent"  
   tools:context="com.sajithkumara.flexibletemplate.fragment.MenuFragment">  
   <LinearLayout  
     android:layout_width="match_parent"  
     android:layout_height="match_parent"  
     android:orientation="vertical">  
     <android.support.v7.widget.CardView  
       android:id="@+id/cardBMI"  
       android:layout_width="match_parent"  
       android:layout_height="35dp"  
       android:layout_margin="8dp"  
       android:background="@android:color/white"  
       app:cardCornerRadius="4dp">  
       <TextView  
         android:layout_width="wrap_content"  
         android:layout_height="wrap_content"  
         android:layout_gravity="center"  
         android:text="Body Mass Index"  
         android:textSize="30sp" />  
     </android.support.v7.widget.CardView>  
     <android.support.v7.widget.CardView  
       android:id="@+id/cardBMR"  
       android:layout_width="match_parent"  
       android:layout_height="35dp"  
       android:layout_margin="8dp"  
       android:background="@android:color/white"  
       app:cardCornerRadius="4dp">  
       <TextView  
         android:layout_width="wrap_content"  
         android:layout_height="wrap_content"  
         android:layout_gravity="center"  
         android:text="Basal Metabolic Rate"  
         android:textSize="30sp" />  
     </android.support.v7.widget.CardView>  
   </LinearLayout>  
 </RelativeLayout>  

You can download from github from https://github.com/SajithKumara/AndroidFlexibleUI.git
Here is a project in playstore which used this template - BMI Calculator .


That's all. Hope it will help to someone. Happy Coding :-) ......